31 Jan 2014

My Training Plan: Week 4

* from SportMedBC's Learn to Run 10K program.
According to my training plan, this week is a recovery week.  As I stated in my previous update (week 3 update), I repeated week 3 to give my body and knees an extra week of early development in this program.  When I decided to do this, I hadn't read ahead and realized that week 4 was actually a recovery week.  So essentially, I gave myself two recovery weeks.  As such, I haven't broken much of a sweat in the last two weeks and I'm itching for a more challenging run.

* from SportMedBC's Learn to Run 10K program.
Week 5 steps up the pace a little so I'm really looking forward to that one.

In the interim, I have been doing a little bit of research on knee injury prevention for runners, mostly as a result of the swelling and stiffness I experienced in the fall.  Even though I visited my doctor to confirm everything was A-OK, and I haven't experienced any re-occurrence, I am still being cautious that I'm doing everything right and taking the right preventative steps to ensure that the problem doesn't come back again.

One article from Runner's World regarding knee pain in beginner runners, which I read back in November or early December, led me to re-evaluate my training plan (or create one to begin with) and progress with a more planned or systematic approach.  Because of this article I started following the Learn to Run 10K program in the first place.

This morning I found a new resource that seems to hit the nail on the head with what I experienced with my knee.  This website, Knee-Pain-Explained.com, has a page specifically on Runners Knee.  Similar to this article, I had some minor swelling and stiffness and I believe that my issue does have to do with my knee cap not tracking properly.  While I don't have the swelling or stiffness I experienced in the fall, my knee cap clicks when I go up stairs (this never happened before I started running last year).  My doctor also believed this was a likely case and gave me some exercises to remediate the problem.

Now, I am not a doctor, I have not studied sports medicine or physiotherapy, and I have very little experience dealing with injuries so I don't want to get into diagnosing problems.  I could be completely wrong.  But there is a key takeaway here.  Consistent with the advice I did get from my family doctor, there are some good, simple exercises that I can incorporate into my daily stretching routine.  This article links to some good knee strengthening exercises and knee cap exercises that I want to incorporate into my routine over the next couple of weeks.

27 Jan 2014

Gear: Foam Roller

Once I started running, and especially once I started having trouble with my knees, I had countless people tell me I should get a foam roller.  I admit I was a bit naive and had rarely ever heard of anyone using such a thing prior to about six months ago.  Before I started running in September 2013, I only rode my bike for exercise and never felt the need for a foam roller.  My whole life I've avoided the gym so useful tools, like a foam roller, rarely, if ever, crossed my path.

When I started having stiffness and some swelling in my knees, my wife went out and bought me one of these from the Running Room last October.  At first, I thought $30 was a lot for a piece of foam.  But it is $30 well spent.  Countless friends and acquaintances of mine that are far more fitness educated than me swear by their foam rollers.  A co-worker of mine big into heavy weights swears by his foam roller before and after every workout.

First, let me warn anyone who has never used a foam roller before, this is going to hurt.  If it makes you cry, you're doing it right.  After a bit of time with it though, the pain becomes far more soothing than painful.  The instructions are simple.  Basically, prop your legs on the foam roller and hold up your upper body with your elbows, arms, or hands.  Then roll back and forth from near your hip down to near your knees.

I usually start with my quadriceps (front), then iliotibial band (outside), then hamstrings (back), and lastly adductors (insides).  This routine just works for me.  I try to isolate each leg by itself.  And the key is that when you find a sore spot, go over it again and again to work out the soreness.  I often find that the sorest spots are somewhere in between the muscles, so I end up on a 45 degree angle targeting somewhere in between my quadriceps and iliotibial band.

After a solid ten minutes, my legs are often much more relaxed and the stiffness is almost completely dissipated.  In all honesty, the pain is much more relief than actual hurt.  Yes, it hurts.  But it is a soothing pain.  And it will feel better once you're done anyway.

I'm not about to make a video doing this myself, so if you want more of a visualization, check out this how-to from Runner's World.

Happy rolling!

23 Jan 2014

Route: Burnaby Fraser Foreshore Park (Burnaby, BC)

Map from the City of Burnaby website.  Click for more detail.
Another one of my favourite routes is the Burnaby Fraser Foreshore Park, which lies along the banks of the Fraser River in south Burnaby.  The park is a bit of a mish-mash of what feels like separate parks strewn alongside a business complex and an industrial area and then connected by both paved and gravel trails, which is exactly what it is.

Nestled along the Glenlyon Business Park and the adjacent industrial area, the park provides some much needed green space to these business areas.  For many who work in the area, the park provides the ideal waterfront vistas for either a lunch time stroller, afternoon workout, or morning walk.

While there isn't too much wildlife in the area, aside from birds and some evidence of beavers, there are always some fishing boats or tugboats pushing logs along the river to watch.  The estuary towards the east end of the trail has what looks like large bird perches, but I've yet to see an eagle or hawk perched atop one.  And if you're lucky, you can even catch a train crossing the old wooden CNR bridge..

In terms of distance, there is enough trail to find a route or combination of routes for up to 10km but for anything longer than that and I start to feel like I'm running in circles.  The west edge of the trail system does, however, connect to the Vancouver trail system that runs through the Riverfront Park and Gladstone Park, providing a much longer route if required.

Overall, it's an awesome trail system that provides much-needed green space in what would otherwise be a very grey area.  See below for a few more pictures.


Update: In April 2014, the City of Burnaby completed an improvement project on a section of this trail that runs between Boundary Road and Glenlyon Parkway.  See my post here.

22 Jan 2014

Route: West Dyke Trail (Richmond, BC)

One of my favourite places to run or ride my bike is along the West Dyke Trail in Richmond.  This trail runs along the west edge of Richmond from the north-west corner at Terra Nova Rural Park down to Garry Point Park in Steveston (see the West Dyke Trail map graphic to the right, taken from the City of Richmond's website).

For those unfamiliar, Richmond is a city at or below sea-level and, as such, is surrounded by a system of dykes and pump stations.  The nice perk to these dykes is that Richmond, which is an island called Lulu Island, has almost a complete pedestrian and bike path around the entire city.  There are three main sections of the dyke/trail: the West Dyke Trail, the South Dyke Trail (which connects to the south end of the West Dyke Trail), and the Middle Arm Trail (which connects to the north end of the West Dyke Trail).

I love running along the trail.  Yesterday, I passed by several Great Blue Herons, one Bald Eagle, and multitudes of people out walking, running, riding their bikes, walking their dogs, or otherwise enjoying the fresh air.  There are a couple of bathrooms along the way, plenty of benches for enjoying the scenery, and several access points (basically, one at each major road).

Given that the West Dyke Trail connects to the other trails at the north and south, there's plenty of opportunity for extending a bike ride or run as long as one would like.

Here are a couple of my recent photos taken along the trail.


21 Jan 2014

My Training Plan: Week 3

After a couple of weeks back at it, I figured it was time for an update.  I have completed the first three weeks of my training plan, the Vancouver Sun's Learn to Run 10K program.  Now, honest confession: weeks 1 and 2 were complete snoozes.  I know it's only my pride speaking here, but walking more than actually running was difficult and hardly even felt like a workout.  In the fall, I was running up to 40-50 minutes without ever slowing down; however, I probably pushed my body too hard to get to that point so quickly.  Cardio-wise, I could handle it but I was straining my joints, mostly my knees.  Knowing that I need to allow my muscles time to develop properly, I had to stick with the plan or risk injury in the future.

This week, Week 3, actually started to feel like a workout.  The first session was run 3 minutes and walk 2 minutes, repeated 7 times (note that all sessions include a 5 minute walking warm-up and cool-down, so while I won't always refer to them, assume that they were included every single workout).  Since I haven't pushed myself in a run since the end of November, this felt like a good workout.  I broke a sweat, finished somewhat out of breath, and felt it in my legs once I was done.

The next two sessions for the week weren't as good as the first, but were still better than anything I did prior to Week 3.  While I'd like to say onwards to Week 4, I have come down with a bit of a cold which has completely zapped my energy.  As such, I am contemplating repeating Week 3 this week.


11 Jan 2014

Gear: Fitbit Force Activity Tracker

Fitbit and the whole activity tracker idea is something I've been intrigued with for over a year.  I originally watched the Jawbone Up and the Fitbit Flex to see how they performed and what issues people had with them.  Both were early iterations of the technology used and were limited in each of their own respects.  Among other things, the original Jawbone Up had no wireless connectivity and the Fitbit Flex had no altimeter.  Neither one had a display.

This past fall, both Jawbone and Fitbit released new versions of their devices.  The Fitbit Force was introduced with a display, which also tells the time.  I liked the idea of a device worn on the wrist as opposed to the Fitbit One, which clips to a belt, clothing, or slides into your pocket.  I liked the new features, including the altimeter.  I liked that it had a display.  Both the web-app and Android app had very clear displays.  And I liked the silent alarm feature.  The Jawbone, in contrast, while a bit more aesthetic in my opinion, limited newer versions of their device to only sync wirelessly with  iOS devices - a painfully limiting product strategy.  But without wi
reless sync and no display to check on progress, that ruled that one right out for me.


So this year, for Christmas, my wife got me a Fitbit Force.  And I love it.  It has replaced my watch so I am not carrying anything additional - merely switching out my watch for a Fitbit.  I like tracking my steps.  I have left it with the default daily step goal of 10,000 steps.  On days I am not working, like weekends, I seem to blow past this goal and reach even 15,000 steps in a day.  However, on days I work, I have to go for a short walk on my lunch and even a 30 minutes walk in the evening (unless I run that particular day).  It has forced me to assess how much time I spend at my desk.  Even in the short time I've had it, I've taken the stairs more often and escalators less (unless I have my 3 year old with me - he loves escalators).

At first, I admit, I was quite nervous that the strap would come undone and my Fitbit would fall off my wrist.  It does "clip" together nicely but I have had it snag on clothing and come off.  Ironically though, the more I wear it, the less that happens.  This is contrary to what I would have thought - I would think more wear would make it a bit looser and easier to come undone.  But I think what is happening is that it is molding more to its shape on my wrist and, therefore, is more "relaxed" in it's buckled form.

My one complaint with it is that it is not waterproof.  I'm used to leaving my watch on - in the shower, swimming pools, etc.  So I have to remember to take off my Fitbit.  It would be ideal if it was waterproof, just like its Flex predecessor.  But it is water resistant to splashing, etc.  So a rainy run and sweat is not going to affect it.  The shower, in all honesty, would probably be fine for it - I've heard of others that wear it in the shower without a problem - but I'm not willing to chance it intentionally.

To some, it may seem over the top to be logging/tracking almost everything you do.  For me, it was simply a way to see how active I am in a given day or week and, thus, to remind me to get off my butt when I've been sitting for too long.  I have an office job; I sit at a desk all day.  Yes, I run, but that's not everyday and still not enough on its own.  So sometimes I just need a reminder to tell me how much I've been sitting.  That, and I do have a propensity to log and track things.

So if you're in the market for an activity tracker, I recommend the Fitbit Force.

Update March 30, 2014: Fitbit has voluntarily recalled the Fitbit Force.  Click here to read my follow-up post.

10 Jan 2014

Gear: Impetus Interval Timer (Android app)

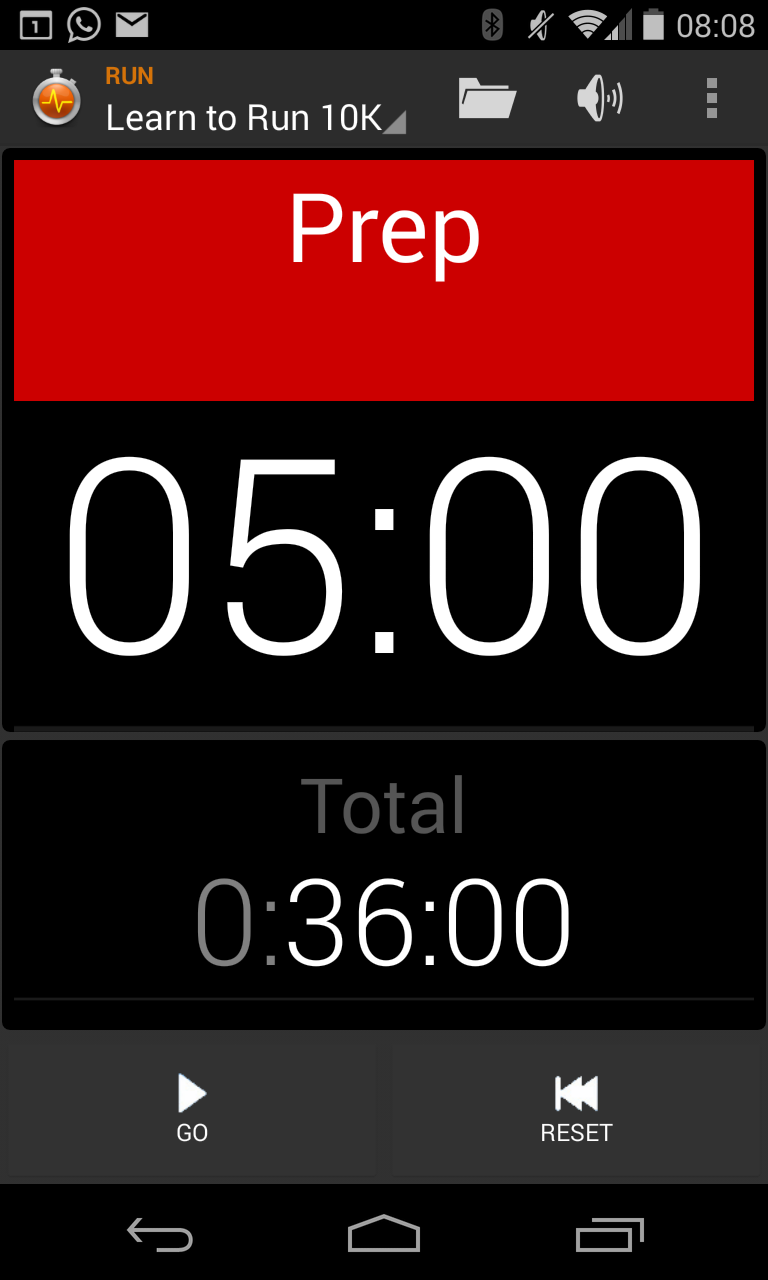
In order to follow my Learn to Run 10K training plan (see my previous post HERE), I wanted to be able to program in my all my intervals without having to worry about look at my watch.  I was previously using the chronometer on my Timex watch and using the lap button to time each interval.  Counting the number of intervals took some thinking and I had to memorize the workout before setting out.  All seemingly simple tasks; but running on my lunch breaks during busy, hectic work days, I did forget a couple of times how many repeats I was supposed to do or how long each one was.

So I started perusing the Google Play Store for an interval timer.  Now, Endomondo does have this functionality in their app too, but only in the premium (i.e. paid) version - I'm looking for free.  I tried a couple out (HIIT Interval Training Timer by Caynax, Interval Timer - Seconds Free by Runloop) but immediately didn't like them.  As soon as I opened them, they looked overwhelmingly complicated.  I admit, that's as far as I went with them.  Uninstalled.

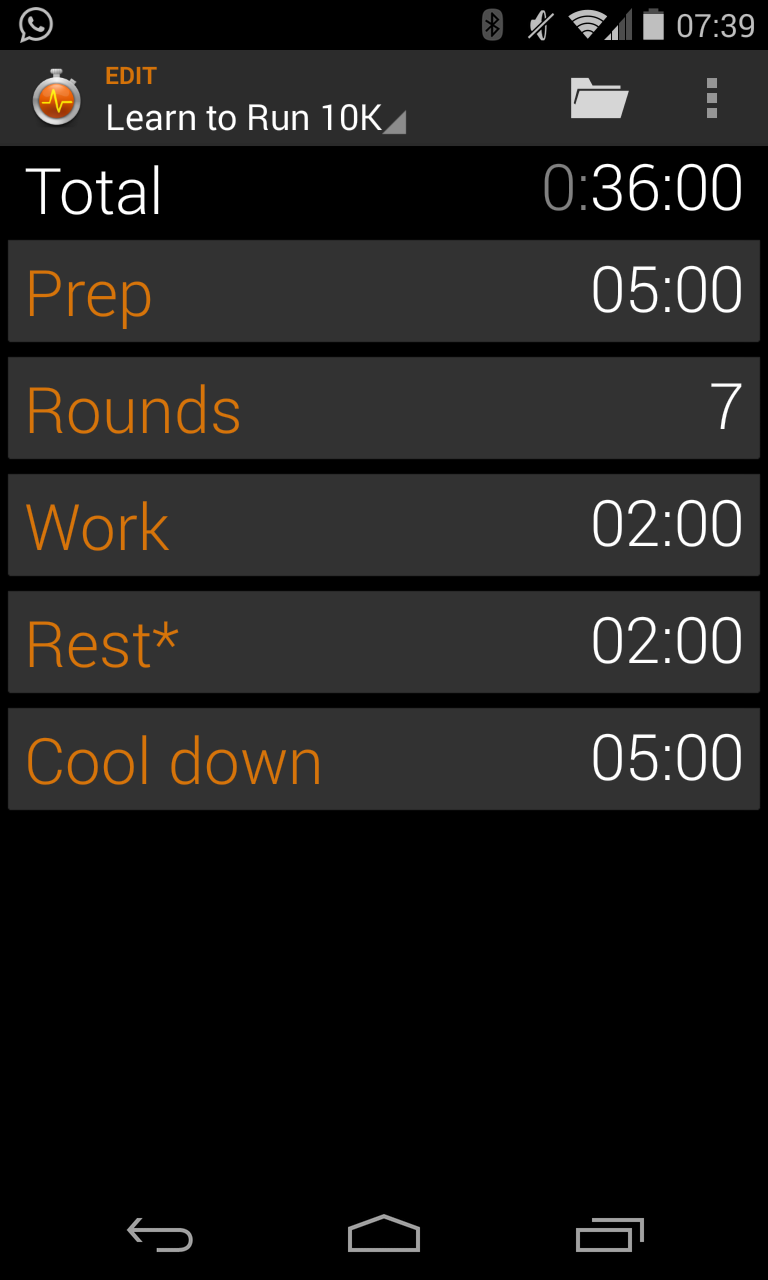
Then I tried Impetus Interval Timer.  Open it up and it's got a very simple, minimalistic display.  In the top left beside the app's own icon it shows the current "preset".  Click it to enter Edit mode.  From here, you can change the warm-up time, number of interval, time of work and time of rest for each interval, and cool down time.  This all follows their simple preset template.  Click on the current "preset" again to go back to Run mode.

Click the folder icon along the top menu bar to change to another preset.  The app comes preloaded with many presets.  I removed them all so I only have my Learn to Run 10K preset for the week one other one that I'll use for off-day bike rides.

Within the menu button in the top right is Settings.  There are a couple of settings I would recommend changing.  When I run, I listen to music.  Not loud, but just enough for the rhythm to keep me on pace.  However, I could barely hear the beeps (alerts) of the app telling me when each interval ended.  So under Settings, click Alerts and sounds.  Uncheck the box that says "Use media stream".  This allows you to set a separate volume for the alerts.  The next option I would check is "Mute music".  This is temporarily mute your music while it plays the beep, which will simply ensure that you hear those beeps.

One other setting I changed is under Display.  I have unchecked the box that says "Keep screen on", yet my screen still seems to stay on during my workout.  Just means I manually have to turn my screen off until I figure out what is keeping it on.

But that's it.  It looks great.  It's simple.  And it works.  Does exactly what I need it to do.